I’ve been working on the first patterns and prototypes for the first two dress designs over the past couple of months. One of the most important, and one of the most difficult, things that I need to work on and get right is the sizing across my range. I need customers to know that once they’ve bought a dress from my website, that they can order a different style but the sizing will be the same. A size 12 needs to be the same in all the designs. As there’s no set standard sizing, it’s really hard to know where to start. Couple that with having to convert the Australian sizes into sizing for other countries, and it’s an almost impossible task. Not all conversions charts convert Australian sizes to the same size in, say, a US or European size. To combat this lack of standard sizing and measurements, I’m going to have to give a really comprehensive list of measurements for my sizes so that customers can decide which size is right for them.


I want the standard sizes on the website to go from size 4 to size 28 (Australian) and I want all the designs to be available in all of these sizes. I don’t believe in telling people what designs they can wear according to the dress size they are. There won’t be a ‘plus size’ section full of shapeless dresses. The dress design that you choose for your size is up to you. But this means that I need to develop a huge range of patterns for all the designs. I’ve decided to do this in sections to make it easier. I’m working with a pattern maker to help develop the patterns. We started with a size 12 bodice pattern. I fitted it on myself and a couple of other girls who were usually a size 12 and made some changes to it. As I made the changes, it soon became clear that this would be my size 10, rather than my size 12. I gave my calico toile with all the changes I’d made back to my pattern maker and she drafted me a new size 12. I made this up as a new calico toile and started the fitting process again. I need to make a few little changes but was generally happy with the fit, so I took it back to the pattern maker again. This time, the pattern maker used the size 12 as a base and graded the pattern down to a size 8 and up to a size 18. I’ve now made all of these bodice sizes up as boned, calico toiles and I’m fitting them all on girls who usually fit into these sizes. So far the sizes 8 to 14 are fitting well. I just need to make them all a bit narrower at the front and a little bit longer under the arm, to stop the underarm squish that nobody wants going on! I need to fit the sizes 16 and 18 on a few more girls before I’m happy with them and ready to draft up to the larger sizes.
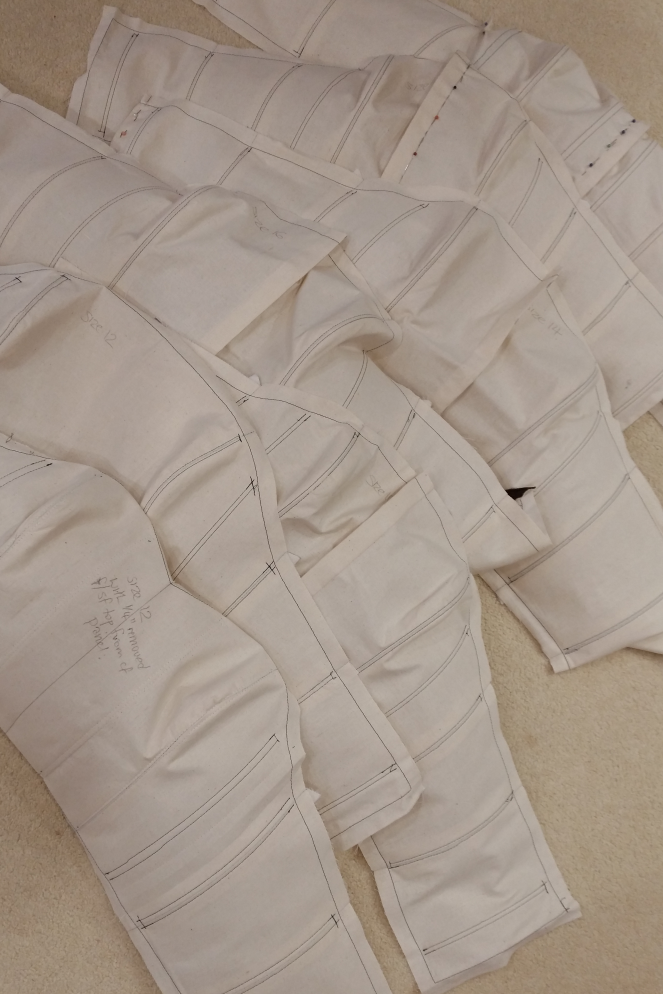
As it’s so hard to get the fit right, I’m contemplating offering the standard sizes in petite (shorter bodice proportions and shorter skirts), tall (longer bodice proportions and longer skirts) and also in odd sizes (11, 13 etc) for those customers who are between sizes. There will also, eventually, be the option for custom sizing, made for you to your measurements. None of these can happen until I’ve got the standard sizing right though, so I have to keep working on that for now.


Once I was happy with the sizing and patterns for the 8, 10, 12 and 14, I decided it was time to make the first prototypes of the first 2 dress designs. I’m a size 12, so I decided to make the first 2 prototypes a size 12 so that I had dresses to wear to any events or pitches. The first thing I needed the dresses for was the video for my Griffin Accelerator application. I had already ordered and received all the lace I needed for the prototype of the ‘Rosalie’ dress design, but hadn’t found the right sequin fabric for the ‘Roxy’ design, so I had to hit the local fabric shops and buy the closest thing I could. I ended up with a black mesh with a scattering of tiny silver sequins. It wasn’t the solid sequin effect I was after, but it would have to do. For the ‘Rosalie’ prototype I decided to go with the black lace over a rich cream satin. Here’s how they turned out –
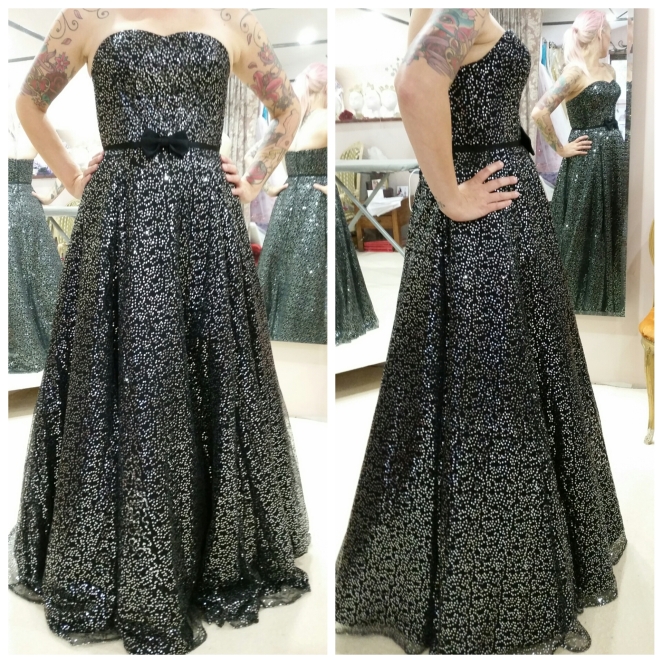
The ‘Roxy’ (above) isn’t right for the design because of the fabric, but I love how it looks. If I can find this gorgeous mesh with the scattered, tiny sequins from a regular supplier, I’ll definitely be developing this into a design for the website. I also made this prototype before I’d cut the patterns higher under the arms, so it does sit a little lower than I’d like, but that’s easily changed. Overall, I’m happy with the fit and it’s really comfortable to wear. I’ve tried it on a couple of other size 12 girls as well and they were happy with how it fit and felt and would like it even more with the extra height under the arms.
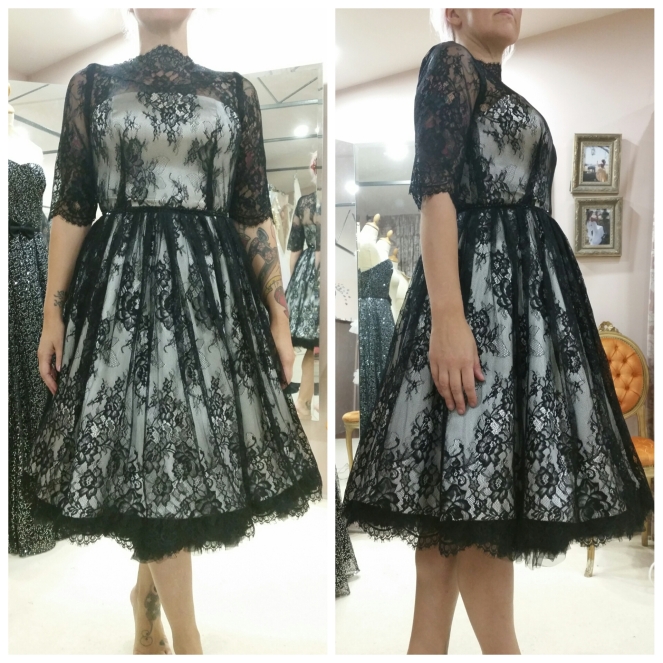
The ‘Rosalie’ (above) came out really well. I just need to work on the lace overlay at the neckline. It was sitting too high and I ended up cutting a curved piece out of it and restitching it lower to get it to sit right. But again, for a first prototype, I was really happy with how it came out. I love the length on me, but I think I’ll want to eventually offer a shorter option as well. I’ve since remade the lace overlay on the bodice part for this dress and now it’s a little too low! I need to recut it somewhere between the 2 and I’ll think I’ll have cracked it.
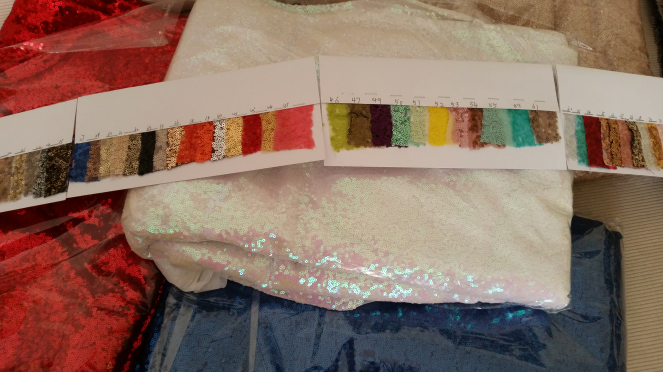
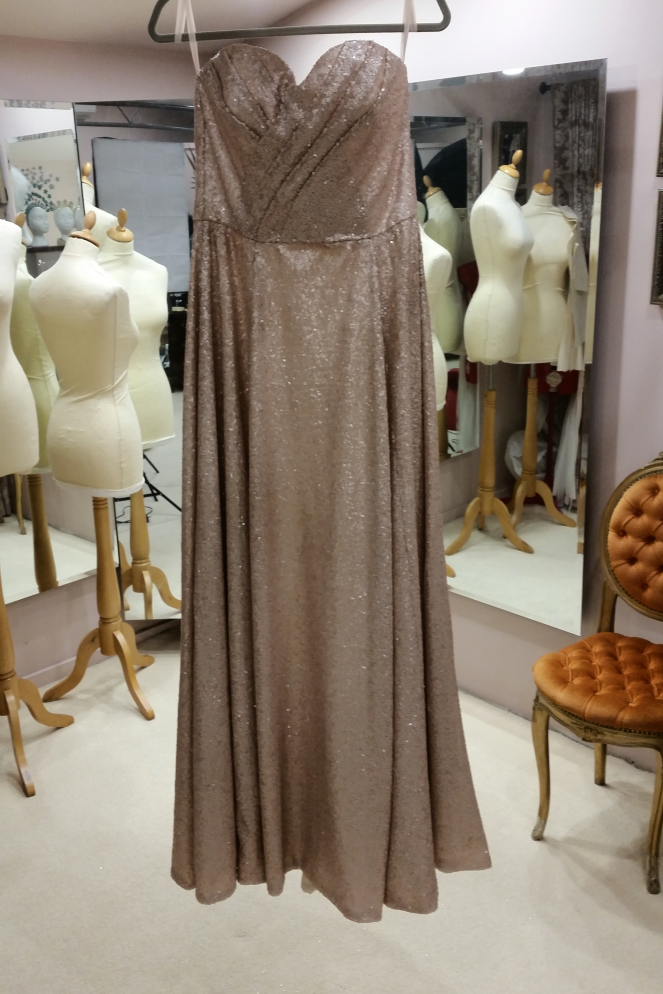
After a bit of a hunt, I found a supplier for the sequin fabric that I wanted for the ‘Roxy’ design and ordered it in 4 colours. I also asked them to send me a sample card for the other colours that they do, expecting it to come in 10 or 15 options. When my order arrived, not only was it gorgeous, but the sample card had 84 different colours!!! It’s going to be so hard to choose! I decided to make a new sample of the ‘Roxy’ to see how it looked in the right sequin fabric. I wanted to do a quick photoshoot and asked the fabulous Sarah Louise if she’d come and model for me. She a size 14, so I made a long version of the ‘Roxy’ in a matt gold sequin for her to wear. I was so happy with how this one turned out. I used the pattern with the extra height under the arm and it looks so much better. This sequin fabric hangs and moves exactly as I hoped it would and works beautifully with the pleats over the bust on the bodice. Pics of the photo shoot with all the dresses coming soon. Vicky x

Well done Vicki! I love the Rosalie short dress it is spectacular.
LikeLike